How to get your Telerik test projects to play nicely with git
Git works well with any file, but files that are merged frequently should put code on multiple lines. Git uses a merge algorithm that works really well but like any merge process is confused when the entire contents of the file are on one line.
Telerik’s tstest files are on one line. Ugh!
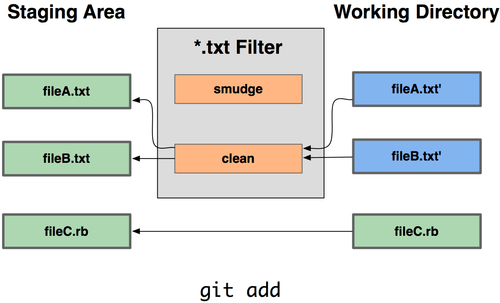
Git clean filters are run as files are staged.
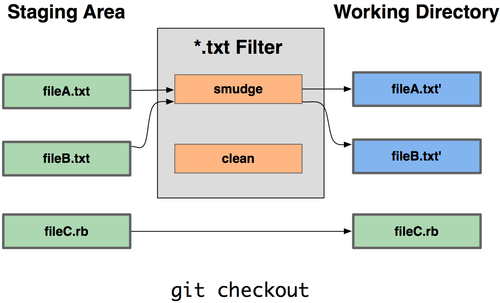
Git smudge filters run when files are checked out.
Individual Setup Instructions
NOTE: If this hasn’t already been set up for the project repository by a developer, skip down the the section titled Initial Install Instructions below.
Step 1: Install Node (if required)
We’re telling Git to run the jsonlint program, but you don’t have it installed on your machine by default. So we’ll need to install Node if you don’t have it installed already.
Download and install Node from nodejs.org. (Link to the download page). I recommend the 64-bit version of the Windows Installer (.msi).
How can I tell if Node is already installed?
Go to your git bash prompt and issue node --version. You should see something like this:
$> node –version
v0.10.28
Step 2: Install jsonlint (if required)
Install jsonlint from the Git command prompt:
$> npm install -g jsonlint
npm http GET https://registry.npmjs.org/jsonlint
… a bunch of lines snipped here …
npm http 304 https://registry.npmjs.org/colors
C:\Users\username\AppData\Roaming\npm\jsonlint -> C:\Users\username\AppData\Roaming\npm\node_modules\jsonlint\lib\cli.js
jsonlint@1.6.0 C:\Users\username\AppData\Roaming\npm\node_modules\jsonlint
+– nomnom@1.7.0 (colors@0.5.1, underscore@1.4.4)
+– JSV@4.0.2
Step 3: Edit your global git config
Git uses smudge and clean filters for checkout and commit operations respectively. So let’s set those up in our global .gitconfig file. From a command line issue the commands:
$> git config –global filter.jsonlint.clean ‘jsonlint -s -p’
$> git config –global filter.jsonlint.smudge ‘jsonlint -s -p’
These commands will put the following lines in your git config file:
[filter “jsonlint”]
clean = jsonlint -s -p
smudge = jsonlint -s -p
Step 4. Check out a .tstest file.
The easiest way to test this is to delete a file and then check it back out from git again. Here’s how I do it from the git bash command prompt:
$> cd /c/Projects/EnterpriseMapper/UITests
$> rm StartTheServices.tstest
$> git checkout — StartTheServices.tstest
$> cat StartTheServices.tstest
If everything worked correctly you should see a file that is json pretty-printed, like this:
{
“__type”: “ArtOfTest.WebAii.Design.ProjectModel.Test”,
“__value”: {
“DomStatesCounter”: {},
“WebKitExecutionDelay”: 0,
“ReuseAppWindow”: 0,
…a bunch of lines snipped…
“Id”: “82eaf885-e480-449d-90a7-a0cda12de6a7”,
“ProjectId”: “b787baf6-e6c4-4df1-bb76-f73r8e4d7a2”,
“Version”: 200
}
}
Initial Install Instructions
Step 1: Insert a line in your .gitattributes file (If required)
Note: this is done project-wide, so only one person needs to do this step. It contains some duplication of the steps above–sorry about that. If you are setting this up for a tester after someone has set this up for the project already, follow the instructions listed above in the Individual Setup Instructions section
You’ll need to put an entry in your .gitattributes file that signifies that the .tstest files should be treated differently. In your favorite editor, add a line that looks like this to the file:
*.tstest filter=jsonlint
What is jsonlint? You need to define it in your git config. Let’s set it up globally so this works across all git repositories.
Step 2: Edit your global git config
Git uses smudge and clean filters for checkout and commit operations respectively. So let’s set those up in our global .gitconfig file. From a command line issue the commands:
$> git config –global filter.jsonlint.clean ‘jsonlint -s -p’
$> git config –global filter.jsonlint.smudge ‘jsonlint -s -p’
These commands will put the following lines in your git config file:
[filter “jsonlint”]
clean = jsonlint -s -p
smudge = jsonlint -s -p
What does this do exactly?
When you checkout a file that ends in .tstest, git will look at the filters you’ve specified in your .gitattributes file. We tell git to run the jsonlint filter which we just defined in our global .gitconfig.
Git will run the smudge command when you check out a file (change branches or get latest version of the file). Git will run the clean command when you commit a file.
We are effectively telling Git to run the jsonlint command when both when we check out a file or commit it. As far as the switches for jsonlint, -s tells the script to sort the keys in the file alphabetically (which will help keep diffs sane), and -p will force a pretty-print of the file even if it is invalid. This will prevent the loss of data if something goes wrong.
Step 3: Install Node (if required)
We’re telling Git to run the jsonlint program, but you don’t have it installed on your machine by default. So we’ll need to insall Node if you don’t have it installed already.
Download and install Node from nodejs.org. (Link to the download page). I recommend the 64-bit version of the Windows Installer (.msi).
How can I tell if Node is already installed?
Go to your git bash prompt and issue node --version. You should see something like this:
$> node –version
v0.10.28
Step 4: Install jsonlint (if required)
If your project doesn’t have the jsonlint node package installed you may have to install it yourself. First let’s check that you don’t already have it.
Open a command prompt and issue jsonlint --version. You should see something like:
$> jsonlint –version
1.6.0
If you don’t see it, let’s install it from the Git command prompt:
$> npm install -g jsonlint
npm http GET https://registry.npmjs.org/jsonlint
… a bunch of lines snipped here …
npm http 304 https://registry.npmjs.org/colors
C:\Users\username\AppData\Roaming\npm\jsonlint -> C:\Users\username\AppData\Roaming\npm\node_modules\jsonlint\lib\cli.js
jsonlint@1.6.0 C:\Users\username\AppData\Roaming\npm\node_modules\jsonlint
+– nomnom@1.7.0 (colors@0.5.1, underscore@1.4.4)
+– JSV@4.0.2
And now you’re all set up. Let’s test it out.
NOTE: I had troubles with jsonlint during some pulls and checkouts:
Error: Cannot find module ‘c:\Projects\WebProject\node_modules\jsonlint\lib\cli.js’
at Function.Module._resolveFilename (module.js:338:15)
at Function.Module._load (module.js:280:25)
at Function.Module.runMain (module.js:497:10)
at startup (node.js:119:16)
at node.js:906:3
error: cannot feed the input to external filter jsonlint
. It would complain about not being able to see C:\Projects\EnterpriseMapper\node_modules\jsonlint\lib\cli.js during git pull commands. To fix this problem, issue this in your git bash prompt:
$> cd C:\Projects\EnterpriseMapper
or wherever your project repo root lies
$> npm install jsonlint
$> git add node_modules
Step 5. Check out a .tstest file.
The easiest way to test this is to delete a file and then check it back out from git again. Here’s how I do it from the git bash command prompt:
$> cd /c/Projects/EnterpriseMapper/UITests
$> rm StartTheServices.tstest
$> git checkout — StartTheServices.tstest
$> cat StartTheServices.tstest
If everything worked correctly you should see a file that is json pretty-printed, like this:
{
“__type”: “ArtOfTest.WebAii.Design.ProjectModel.Test”,
“__value”: {
“DomStatesCounter”: {},
“WebKitExecutionDelay”: 0,
“ReuseAppWindow”: 0,
…a bunch of lines snipped…
“Id”: “82eaf885-e480-449d-90a7-a0cda12de6a7”,
“ProjectId”: “b787baf6-e6c4-4df1-bb76-f73r8e4d7a2”,
“Version”: 200
}
}
Read More
To read more about the magic of git attributes and filters, see (Git Attributes)